Tuesday, June 3, 2008

Contest Entry Registration Instructions

If you plan on entering the DIP Contests then you must do the
following. These instructions will be a one time thing that you
will have to do to enter the contests held on this site. There will
be many contests held here.

To enter pages in the contests you must go to the DIP Store and
register in the gallery to upload pages into our contests.

Here are the step by step instructions on how to register with screenshots. Just follow the red arrows.

1. Got to the DIP store by clicking on the store link in this blog
or typing in the following address
http://digitalimageryplus.com/

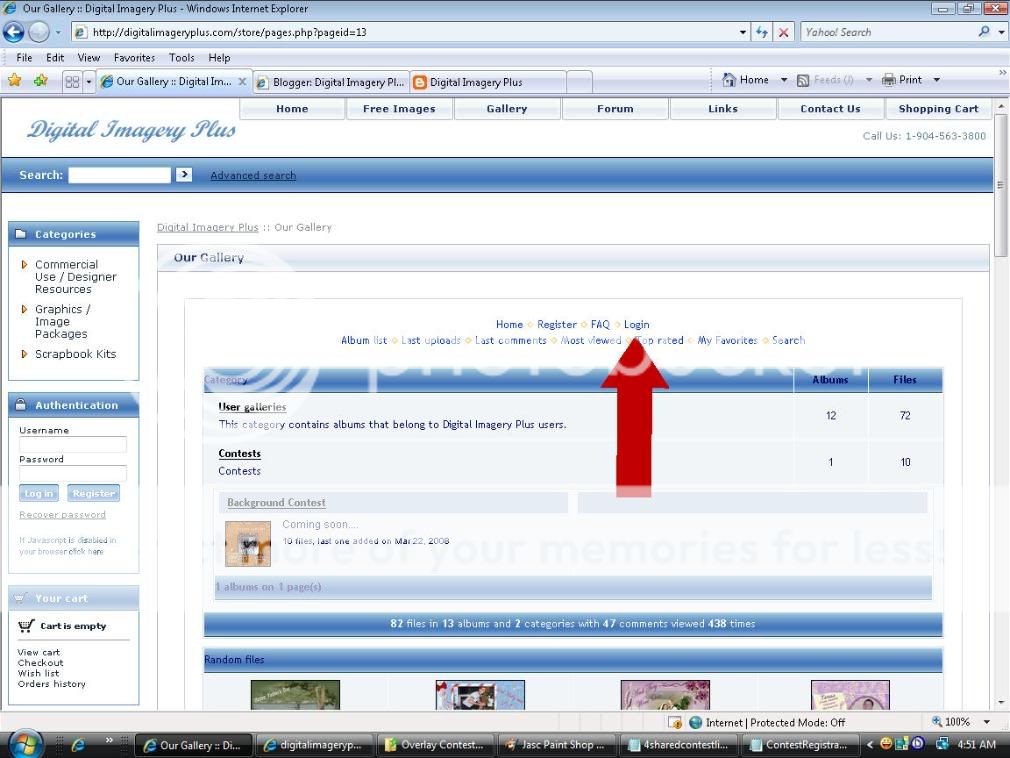
2. Click on Gallery in the links at the top of the page.


3. Click on register, read and agree to terms, and enter in your
information. A confirmation email will be sent to your email
address. Click on the link in your email to activate your account
and continue.


4. When you arrive by link back to the gallery, you will need to go
to the top links and click login. Enter your username and
password.


5. You will need to create your Gallery next by clicking on the
link at the top that says create/order my albums.


6. Click on NEW then in the box at the bottom where it says New
Album typ the name that you want your album to be. Click on Apply
Modifications. Then click on OK when it asks if you want to apply
the modifications, then click continue.


TO UPLOAD A PAGE

1. Files can not be over 1 MB (1024 KB) in size so if your page is
larger than this you will have to resize it before you start or it
will not upload.

2. Click UPLOAD FILE at the top and then Browse for your file, it
will upload.

3. Next it will ask that you choose an album to place it in, this
will be where you will choose the contest album of the ongoing
contest that you are entering. In the comment section enter
description and information required per contest rules.


That is it. Once you have registered then the next contest you
will just login with your information and upload your pages. So
this will not have to be done again.We hope you will enter many of our contests.


Monday, June 2, 2008

Our Full Terms of Use

You may use the images in our package for both personal and commercial purposes. Digital Imagery Plus holds the copyright on the compilation package. We ask simply that you not redistribute the images for resell or freebies in their original state. You cannot sell or give away the package. Images are to be used as tools and enhancements for your own creative endeavors. Credit is not required, but always appreciated!

FAQ
Can I use these images to make greeting cards?
YES

Can I use the images for designing scrapbook kits?
YES

Can I use the images in altered art projects?
YES

Do you require a link or credit?
NO

Can I use the images for craft projects and fairs where I will be profitting from their usage?
YES

Can I make an image cd, dvd or downloadable package with the original images for resell purposes?
NO

Can I give the images away on my website?

Maybe. If you alter the image you may use it for a freebie. If you simply wish to give it away as is, this is not allowed.

I hope that we have covered all of your questions, but please feel free to email us if you have concerns that have not been addressed. Basically we want you to use our images and to enjoy them without the hassle of stepping on our copyright. We have tried to offer you images that have very few strings attached.

Please respect the work that has went into our packages and honor what few restrictions we have placed on our image packages.

Sunday, June 1, 2008

How To Create an Overlay

How to Create an Overlay

This tutorial is my own creation from years of using Paint Shop Pro. I thank you for respecting this as my work by not posting it, in whole or in part, in any other location without written permission from 2MrsSumners Designs, Debbie or Laura Sumner!

This is just one way to create an overlay in Paint Shop Pro.

While I do not consider myself a tutorial writer I will try and explain how to create an overlay. This is only one way, as there are many different ways to do this.

Supplies Needed

You will need a graphics program that will handle layers. I will be using Paint Shop Pro 9 for this tutorial. If using another program find where your tools are, most programs can do what this tutorial does in some way.

Cleaned .png files - any .png files that you think will look good as an overlay. You will use your own creativity and imagination here. It will be better to use more simple images.

I will not be showing or telling how to clean a graphic there are many tutorials on the internet that deal with this and they are very good ones.

1. Open a 3600 x 3600 pixel transparent raster layer in PSP.


2. Open one of your cleaned images and go to Edit, Copy. Close out this image so that
your first image is showing.


3. Go to Edit, Paste, and Paste as New Layer.


4. If the images is small use the deform tool to resize to what you want. Do not resize too
large, you do not want your image to be pixelated. This just means looks like many
tiny squares. If you get this size it back down.


5. Repeat step 3 until you have all the images that you are going to use on the main
page, or if one image is all you are using then continue. Here I have decided to use
one single image and I have duplicated it many times.


6. Using the Move tool move your image or images, wherever you want them on the
page. You can even Mirror some for more effects as well. I have decided that I
wanted a couple more leaves and buds. So I duplicated a layer twice. Adjusted one
smaller with the deform tool and used the eraser brush to erase the flower and
unwanted stem parts, mirrored a couple and arranged them to be behind all of my
layers.


Here is my final arrangement.


7. When everything is where you want it and it looks to suit you, then go to Layers,
Right Click on any layer, go to Merge, Merge Visible and left click. All overlays
do not have to be black so if you like the one you have then go to file, save as and
save, as a .png file to keep your transparency. If you want a black overlay then go
to Adjust, Brightness and Contrast, and move your Brightness all the way down to
-255


We are done. There are many ways to colorize overlays if you want to colorize them, just search for a tutorial or that may be one for next time. I hope you enjoy making overlays for your projects. Here is one that I have done, I love some overlays left in full color so I always save them as the original and then black as well.


LilSky was nice enough to be my tester on the tutorial and below is her results.
Thank You .